Featured image of post 手把手教你搭建 V2Ray (WS+TLS) + Nginx 反向代理

手把手教你搭建 V2Ray (WS+TLS) + Nginx 反向代理

v2ray 服务端配置参考

 1
 2
 3
 4
 5
 6
 7
 8
 9
10
11
12
13
14
15
16
17
18
19
20
21
22
23
24
25
26
27
28
29
30
31
32
33
34
35
36
37
38
39
40
41
42
43
44
45
46
47
48
49
50
51
52
53
54
55
56
57
58
59
60
61
62
63
64
65
66
67
68
69
70
71
72
73
74
75
76
77
{
  "log": {
    "loglevel": "warning",
    "access": "/var/log/v2ray/access.log",
    "error": "/var/log/v2ray/error.log"
  },
  "inbounds": [
    {
      "port": 15421,    # 改成自己的端口,注意防火墙开启15421端口
      "listen": "127.0.0.1",
      "protocol": "vmess",
      "settings": {
        "clients": [
          {
            "id": "xxxxxxxxx",    # 改成自己的id
            "alterId": 64
          }
        ]
      },
      "streamSettings": {
        "network": "ws",
        "wsSettings": {
          "path": "/ray"    # /ray 路径需要和v2ray客户端、nignx配置里保持一致,可将ray改成一个uuid
        }
      }
    }
  ],
  "outbounds": [
    {
      "protocol": "freedom",
      "settings": {},
      "tag": "direct"
    },
    {
      "protocol": "freedom",
      "settings": {
        "domainStrategy": "UseIPv4"
      },
      "tag": "ip4-out"
    },
    {
      "protocol": "blackhole",
      "settings": {},
      "tag": "blocked"
    }
  ],
  "routing": {
    "rules": [
      {
        "type": "field",
        "domain": ["domain:google.com"],
        "outboundTag": "ip4-out"
      },
      {
        "type": "field",
        "ip": [
          "0.0.0.0/8",
          "10.0.0.0/8",
          "100.64.0.0/10",
          "127.0.0.0/8",
          "169.254.0.0/16",
          "172.16.0.0/12",
          "192.0.0.0/24",
          "192.0.2.0/24",
          "192.168.0.0/16",
          "198.18.0.0/15",
          "198.51.100.0/24",
          "203.0.113.0/24",
          "::1/128",
          "fc00::/7",
          "fe80::/10"
        ],
        "outboundTag": "blocked"
      }
    ]
  }
}

 重启v2ray服务端:

1
systemctl restart v2ray

安装 Nginx

参考:https://www.cnblogs.com/gede/p/11011693.html

执行安装命令

1
sudo apt-get install nginx

查看版本检测是否安装成功

1
nginx -v

配置 Nginx

切换到 nginx 的配置文件夹目录

1
cd /etc/nginx/conf.d

申请免费 ssl 证书

方案一:可以使用在 TLS 教程里生成的证书(传送门

方案二:使用 certbot 自动签一个 let’s encrypt 证书

 例如我的系统是 ubuntu 16.04,网站运行在 nignx 上(其他版本请在页面自己选择),签发证书参考:https://certbot.eff.org/lets-encrypt/ubuntuxenial-nginx

 注意:第 4 步选择 just get a certificate 即可。

 英文教程看起来费劲的话,参考:Ubuntu免费ssl证书(Let's Encrypt)配置(里面的配置文件内容不用参考)

 证书生成成功的提示信息,可以查看保存的位置:

 1
 2
 3
 4
 5
 6
 7
 8
 9
10
11
12
13
14
15
16
17
18
19
IMPORTANT NOTES:
- Congratulations! Your certificate and chain have been saved at:
   /etc/letsencrypt/live/yourdomain.com/fullchain.pem
   Your key file has been saved at:
   /etc/letsencrypt/live/yourdomain.com/privkey.pem
   Your cert will expire on 2020-11-10. To obtain a new or tweaked
   version of this certificate in the future, simply run certbot
   again. To non-interactively renew *all* of your certificates, run
   "certbot renew"
- Your account credentials have been saved in your Certbot
   configuration directory at /etc/letsencrypt. You should make a
   secure backup of this folder now. This configuration directory will
   also contain certificates and private keys obtained by Certbot so
   making regular backups of this folder is ideal.
- If you like Certbot, please consider supporting our work by:


   Donating to ISRG / Let's Encrypt:   https://letsencrypt.org/donate
   Donating to EFF:                    https://eff.org/donate-le

添加对应网站的配置文件

 常用的命名规则:项目名 + 二级域名 + 端口.conf,例如:

1
vim v2ray-yourdomain-15421.conf

 配置内容:

 1
 2
 3
 4
 5
 6
 7
 8
 9
10
11
12
13
14
15
16
17
18
19
20
21
22
server {
  listen  443 ssl;    # 注意防火墙开启443端口
  ssl on;
  ssl_certificate       /etc/letsencrypt/live/yourdomain.com/fullchain.pem;    # 你的ssl证书
  ssl_certificate_key   /etc/letsencrypt/live/yourdomain.com/privkey.pem;    # 你的ssl key
  ssl_protocols         TLSv1 TLSv1.1 TLSv1.2;
  ssl_ciphers           HIGH:!aNULL:!MD5;
  server_name           yourdomain.com;    # 你的网站域名
        location /ray {    # /ray 路径需要和v2ray服务器端,客户端保持一致
        proxy_redirect off;
        proxy_pass http://127.0.0.1:15421;    # 此IP地址和端口需要和v2ray服务器保持一致
        proxy_http_version 1.1;
        proxy_set_header Upgrade $http_upgrade;
        proxy_set_header Connection "upgrade";
        proxy_set_header Host $http_host;


        # Show realip in v2ray access.log
        proxy_set_header X-Real-IP $remote_addr;
        proxy_set_header X-Forwarded-For $proxy_add_x_forwarded_for;
        }
}

 保存配置文件后,检查配置是否有错误:

1
nginx -t

 重启 nginx 使配置文件生效:

1
service nginx restart

v2ray 客户端配置参考

方案一:V2Ray客户端配置文件,以服务形式运行:

 1
 2
 3
 4
 5
 6
 7
 8
 9
10
11
12
13
14
15
16
17
18
19
20
21
22
23
24
25
26
27
28
29
30
31
32
33
34
35
36
37
38
39
40
41
42
43
{
    "inbounds": [
      {
        "port": 1080,
        "listen": "127.0.0.1",
        "protocol": "socks",
        "sniffing": {
          "enabled": true,
          "destOverride": ["http", "tls"]
        },
        "settings": {
          "auth": "noauth",
          "udp": false
        }
      }
    ],
    "outbounds": [
      {
        "protocol": "vmess",
        "settings": {
          "vnext": [
            {
              "address": "yourdomain.com",
              "port": 443,
              "users": [
                {
                  "id": "xxxxxxxx,
                  "alterId": 64
                }
              ]
            }
          ]
        },
        "streamSettings": {
          "network": "ws",
          "security": "tls",
          "wsSettings": {
            "path": "/ray"    # /ray 路径需要和v2ray服务器端,nginx配置里保持一致
          }
        }
      }
    ]
  }

方案二:下载Windows客户端–V2rayN(新手下载.zip包)(推荐)

 打开软件,点击:服务器→添加[VMess]服务器:

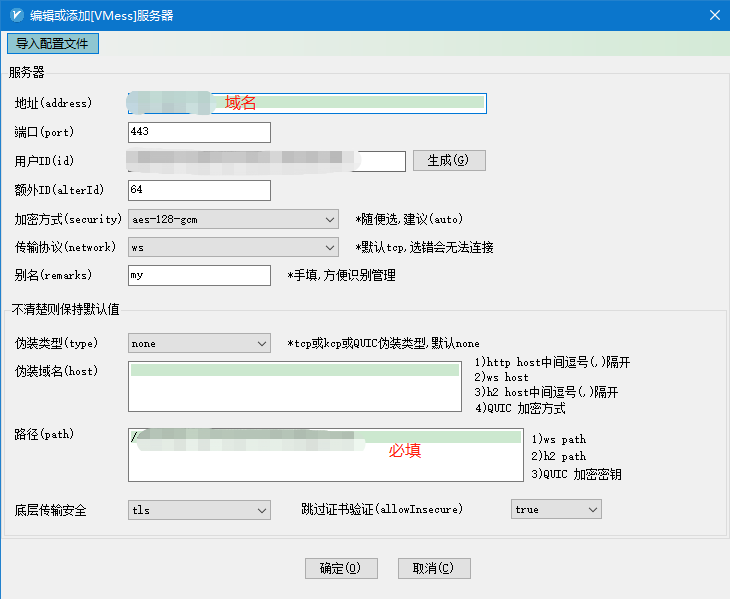
 填上你设置的对应数据,如服务器 ip、端口、UUID(服务端和客户端必须一致),加密方式一般为 aes-128-gcm ,协议为 ws ,伪装域名留空,路径为 /ray,开启 tls 和不安全传输,设置完保存。

 右键 V2RayN 的系统栏小图标,点击启用 Http 代理,Http 代理模式选择第二个 PAC 模式,最后再打开 V2RayN 软件面板,在检查更新里选择更新 PAC。到此,V2Ray 就全部配置完成了。

 谷歌浏览器测试一下:

使用 Hugo 构建
主题 StackJimmy 设计